
TL;DR
This post details how to set-up GPG to sign your commits/tags, as well as adding your GPG public keys to your GitHub account.
The Story
In this blog post, I will detail how you can set-up their system such that they can use a GPG key to sign their git commits/tags and why you need to.
Judging from the title of this post you are probably wondering, why should I even sign my commits or what is GPG and what difference does this make. You would also probably be like, I have been pushing code to GitHub for ages and why do I need to sign my commits now…
What GPG is?
According to their website:
GnuPG allows you to encrypt and sign your data and communications; it features a versatile key management system, along with access modules for all kinds of public key directories. GnuPG, also known as GPG, is a command-line tool with features for easy integration with other applications.
One thing to take note of is the difference between GPG(Gnu Privacy Guard) and PGP(Pretty Good Privacy), most people confuse the two. See Difference between PGP and GPG link to understand the difference. Note that this is not about the difference between the two.
Why should I sign my commits?
A great answer that I found on stackexchange, reads:
There are several ways in which a git repository can be compromised (this isn’t a security flaw, just a fact of life one should not avoid using git because of this). For example, someone may have pushed to your repository claiming to be you. Or for that matter, someone could have pushed to someone else’s repository claiming to be you (someone could push to their repository claiming to be you too). This is just part of life in a distributed version control system.
Just as an example, I will show you how one’s commits can be compromised:
Let’s change my name and email before we commit and push.
$ git config --global user.name 'Arnold Schwarzenegger'
$ git config --global user.email 'terminator@schwarzenegger.com'
Add a simple README.md to a repo, commit and push.

There, I’ve changed my git configuration to pretend I’m Arnold Schwarzenegger - “I’ll be back”.
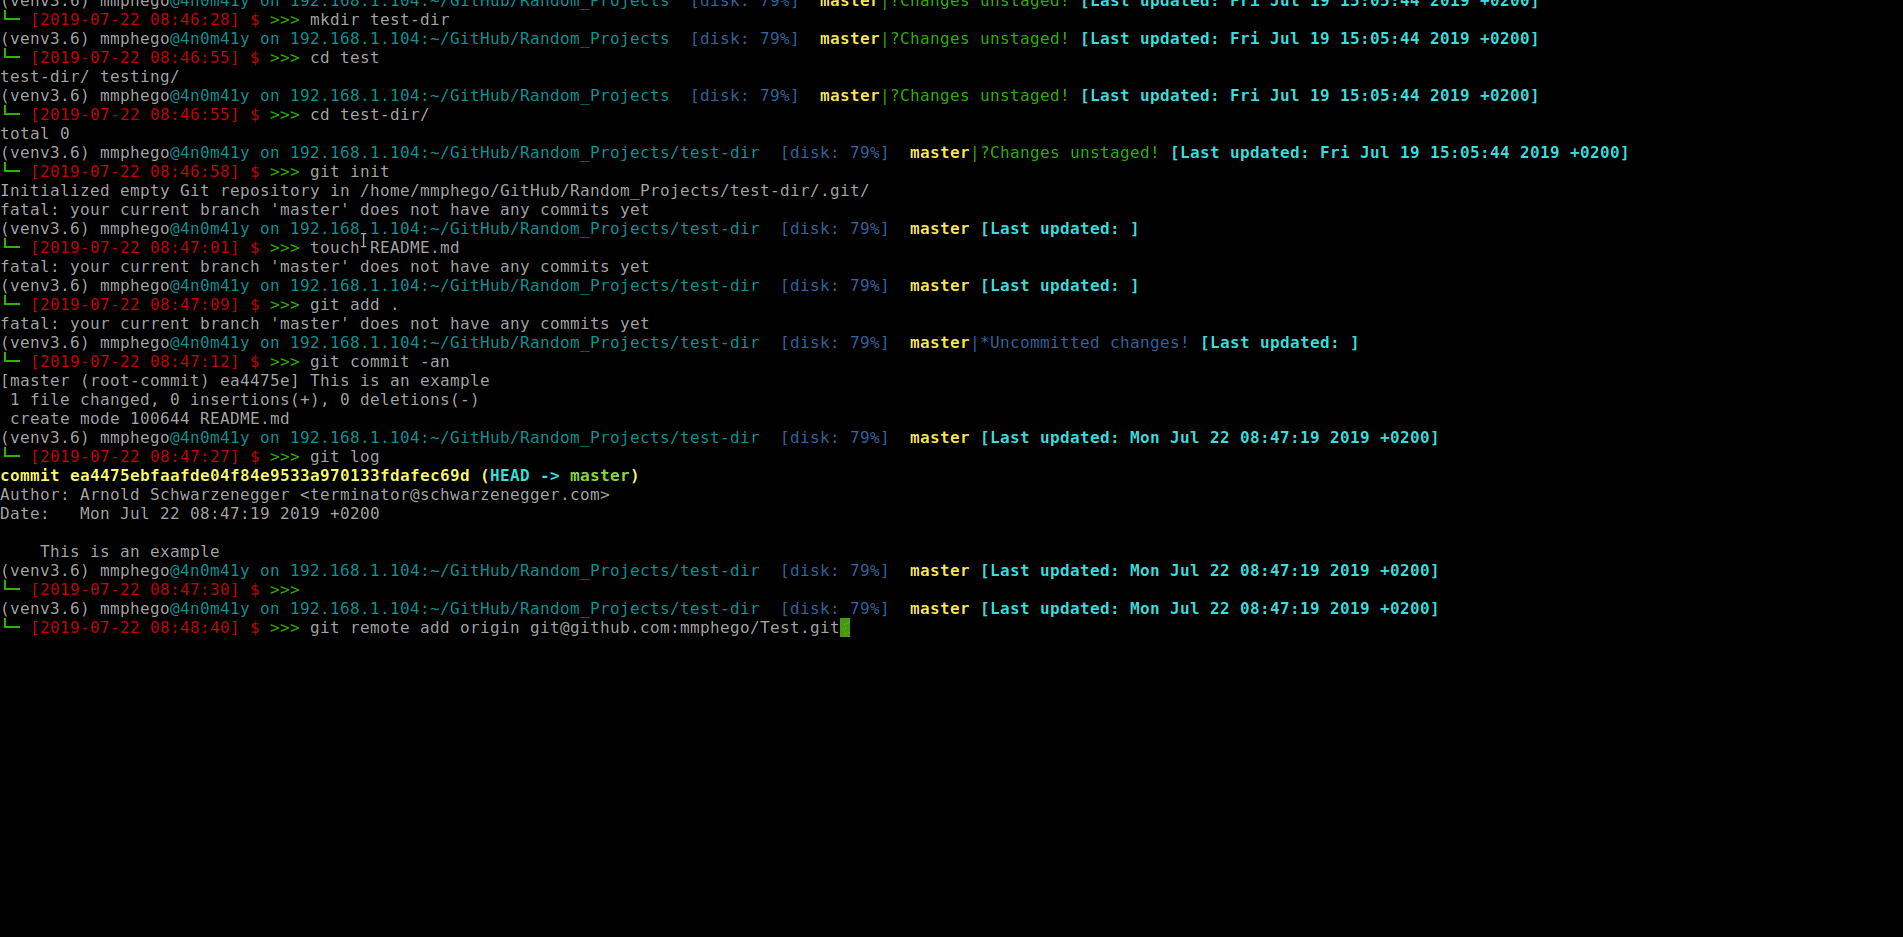
And now I can commit away, Imagine those commits somehow make their way into a production system.
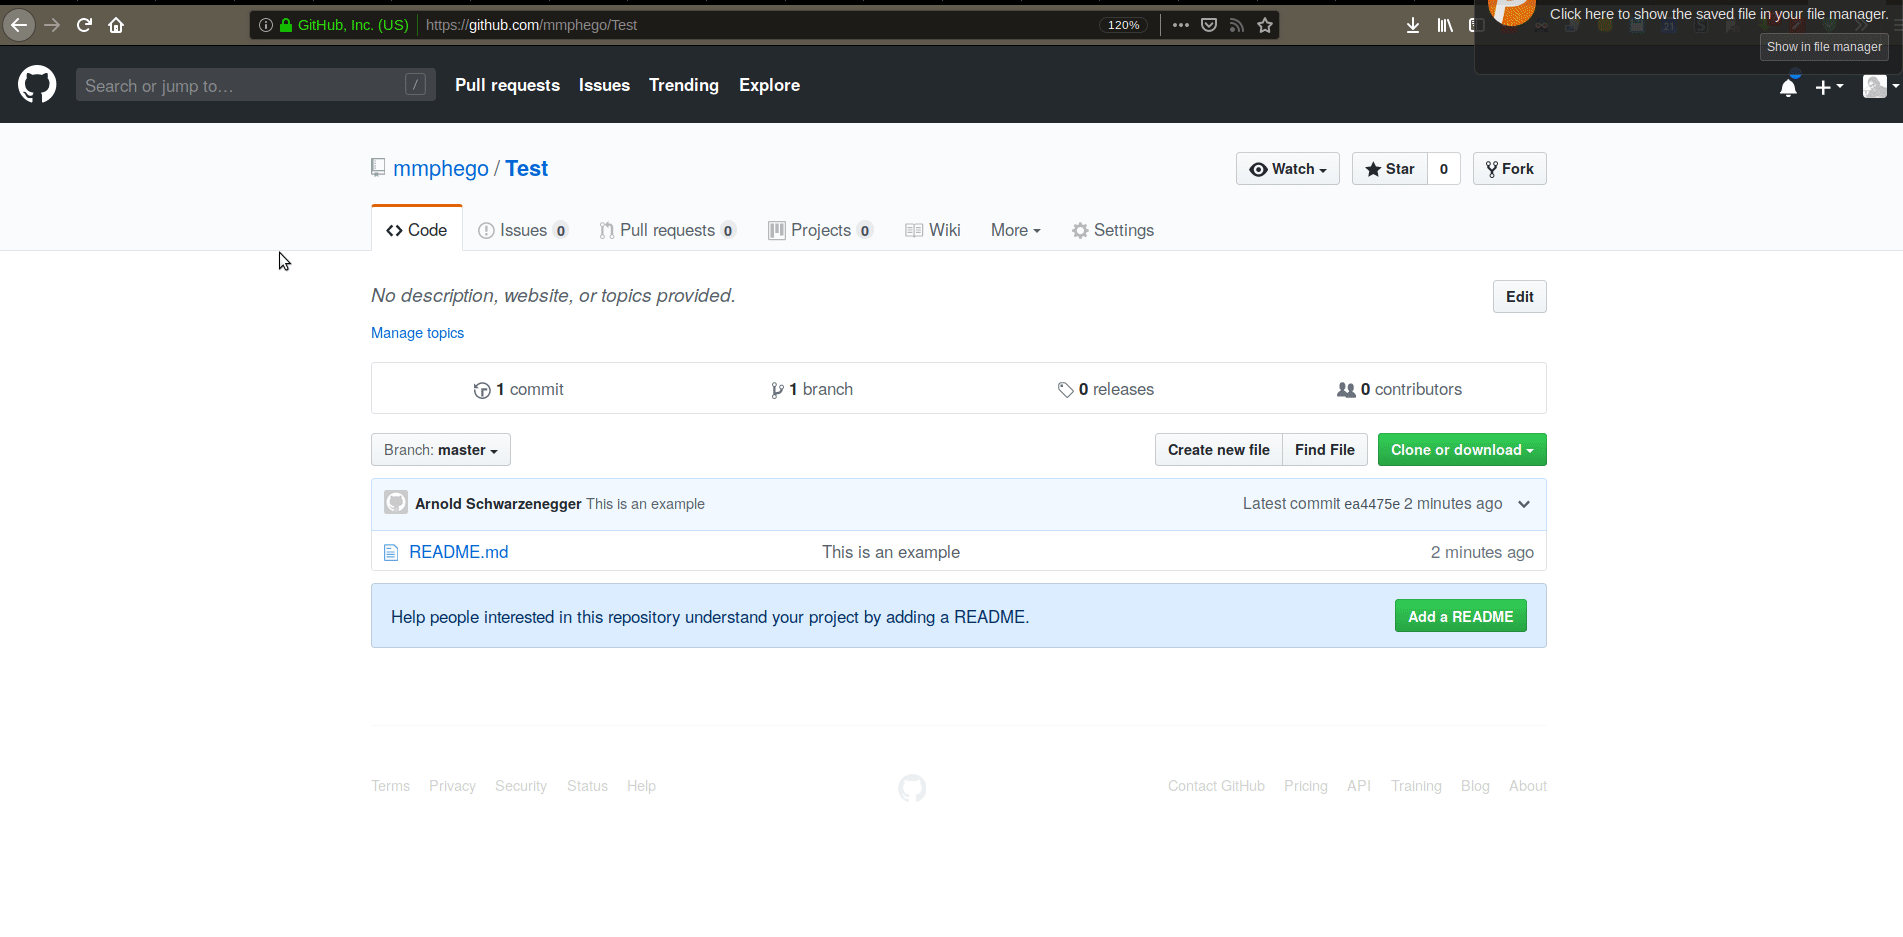
This was a simple example, imagine if someone would impersonate you and make dangerous changes to a production system.
However, this can be avoided by simply GPG-signing your commits, one can prove that certain commits were originally done by you (and things that aren’t signed shouldn’t have made it into the production build). That’s the key to it all, by signing commits you’ve added a stamp of approval - confirming that this is your work.
There is some debate as to if every commit should be signed. From GPG signing for git commit? (back in ‘09), Linus Torvalds wrote:
Signing each commit is stupid. It just means that you automate it, and you make the signature worthless. It also doesn’t add any real value, since the way the git DAG-chain of SHA1’s work, you only ever need one signature to make all the commits reachable from that one be effectively covered by that one. So signing each commit is simply missing the point.
I find that signing every commit is a good thing. That way it gives me peace of mind knowing that that the commits with my signature came from me, at the end of the day it isn’t too expensive to sign every commit. Plus the other thing is that one has the option of squashing all their commits into one before they merge with master or production branch.
SSH Keys vs GPG Keys
Something to take note of when you authenticate to Github with your SSH key, is that the authentication doesn’t become part of the repository in any meaningful or lasting way. It merely just causes Github to give you access for that moment, but it doesn’t prove anything to anyone who is not Github.
However, when you GPG-sign a git commit, that commit becomes part of that repository, and can be pushed to other copies of the repository. Thus, other people who clone that repository can verify the signed commit, with the assumption that they have access to your public key and reason to trust it.
Note: Signing Git commits using GPG isn’t a requirement in most projects, but it gives other people/contributors/collaborators a piece of mind and let them know that they can trust that you committed the changes in a project.
Note: This guide will assume that you haven’t set-up your GPG keys yet, and running Debian.
The How
In this section, we will install all dependencies and tackle some challenges you might encounter when generating GPG keys.
Installation
Before we continue we need to install some packages, run the following command (Assuming you are on Debian):
sudo apt install --install-suggests gnupg2 pinentry-curses pinentry-gtk2 rng-tools
According to the man-page:
pinentry is a program that allows for secure entry of PINs or passphrases. That means it tries to take care that the entered information is not swapped to disk or temporarily stored anywhere. This functionality is particularly useful for entering pass phrases when using encryption software such as GnuPG or e-mail clients using the same. It uses an open protocol and is therefore not tied to particular software.
gpg is the OpenPGP part of the GNU Privacy Guard (GnuPG). It is a tool to provide digital encryption and signing services using the OpenPGP standard.
rngd: This daemon feeds data from a random number generator to the kernel’s random number entropy pool, after first checking the data to ensure that it is properly random.
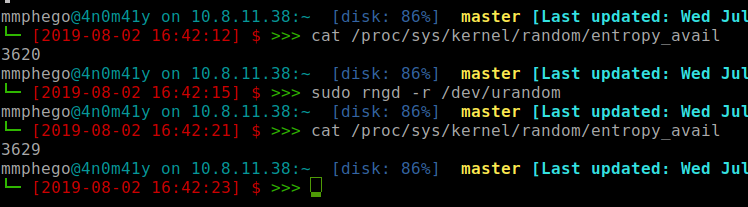
Generate enough Entropy for GPG key generation process.
GPG key generation usually takes longer if you do not have enough Entropy on your system this might lead your system to hang Or if you get a message as follows:
Not enough random bytes available. Please do some other work to give the OS a chance to collect more entropy! (Need 283 more bytes)
A simple workaround to this is to generate enough entropy. After you installed the packages above, run the following command to gain enough Entropy:
sudo rngd -r /dev/urandom
Repeat the above command until you got enough Entropy(at least > 3000) before you create a GPG key.
To check the number of bytes of entropy available run the command:
cat /proc/sys/kernel/random/entropy_avail
The Walk-through
In this section, we will generate the keys, upload them to Github either via the website or API using Python script and finally sign our commit message and confirm it’s verified.
Generate GPG Keys
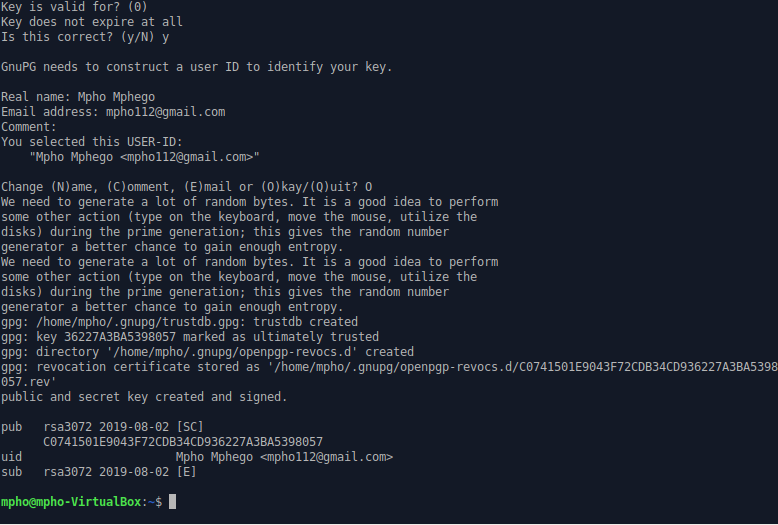
Once you have all the dependencies installed in your system, we can generate the GPG keys.
Now, let’s try to generate GPG keys and then export them to a file (gpg_keys.txt) which we will need later. Run the command below and follow the prompts.
Note: The GPG_TTY environment variable should hold the path to the TTY device for the current interactive shell, for example in the ~/.bashrc:
DO NOT FORGET THE PASSPHRASE YOU ENTERED
gpg --full-generate-key
MY_GPG_KEY=$(gpg --list-secret-keys --keyid-format LONG | grep ^sec | tail -1 | cut -f 2 -d "/" | cut -f 1 -d " ")
gpg --armor --export "${MY_GPG_KEY}" > gpg_keys.txt
echo "export GPG_TTY=$(tty)" >> ~/.bashrc
Add PGP Key to GitHub
Via GitHub Page
Adding your new key to GitHub is fairly simple and straight forward. You can follow the instruction here.
TL;DR choose the later option of using a Python script below.
Via GitHub API
I created a Python script, that adds GPG keys to the authenticated user’s GitHub account using GitHub’s API. The file requires your GitHub’s Username, Password (NOTE: You information is never stored.) and a file containing your GPG keys.
#!/usr/bin/env python

# Script assumes you have requests installed.
# Usage:
#    python github_gpg.py -u `github-username` -p `github-password` -f gpg_keys.txt

import argparse
import json
import requests
import sys

api_url = 'https://api.github.com/user/gpg_keys'

def main():
    parser = argparse.ArgumentParser()
    parser.add_argument('-u', '--username', required=True, help="GitHub Username")
    parser.add_argument('-p', '--password', required=True, help="GitHub Password")
    parser.add_argument('-f', '--key_file', required=True, help="File containing PGP Pub Key")
    args = vars(parser.parse_args())
    session = requests.Session()
    session.auth = (args.get('username'), args.get('password'))

    with open(args.get('key_file')) as f:
        gpg_key = f.readlines()

    json_data_dump = json.dumps({'armored_public_key': ''.join(gpg_key)})
    resp = session.post(api_url, data=json_data_dump)
    sys.exit(0) if resp.status_code == 201 else sys.exit(1)

if __name__ == "__main__":
    main()
Signing your commits.
The final piece of the puzzle is to tell your local git command to sign the commits using your key. This can be set either per-repository or globally across all repositories in your computer’s current user with the --global flag or you can sign individual commits.
To sign an individual commit, add the -S option when committing changes.
git commit -S -m "Signed commit"
Or,
Use the git config user.signingkey option to specify the Key ID you just generated above for git to use. You can also require Git to sign all commits with the commit.gpgsign option.
git config --global commit.gpgsign true
git config --global user.signingkey "${MY_GPG_KEY}"
Note, you will need to add your key to any computer/login that you use for commits to be signed.
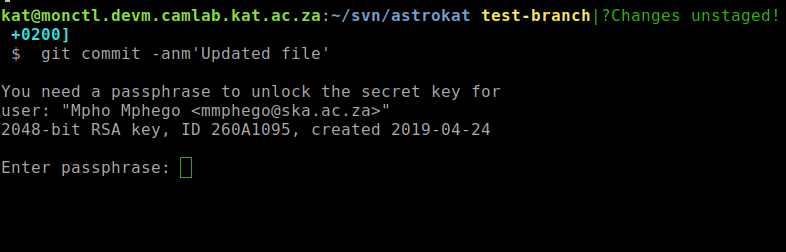
Now, when you make any commits, Git will attempt to sign them with your key. It may ask you to unlock your key with a passphrase that you entered when generating the keys.
After pushing to GitHub, you should see a nice “Verified” badge on the commit…
Any future commits you from your computer or user will be verified, proving you are the author of your work.

Note: Signing git commits won’t stop people from impersonating you, but it will provide assurance of your real commits so they can be properly verified.
That’s all…
Reference
- The GNU Privacy Guard
- Signing commits
- Signing Git Commits
- Signing Git Commits and Tags Using Your GPG Key
- A Git Horror Story: Repository Integrity With Signed Commits
- What are the advantages and disadvantages of cryptographically signing commits and tags in Git?
- Automatic Git commit signing with GPG
- Further Reading: Export GPG key to SSH