Updated: 9 March, 2020
The Story
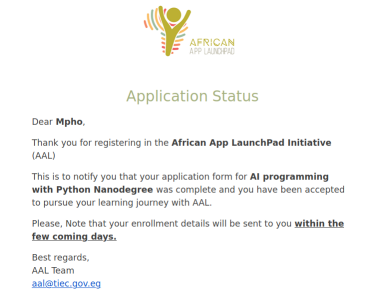
It has been quite a while since I last wrote a post, but I had reasons. A few months ago I received an email from Udacity and AAL (African App Launchpad Program) detailing a list of scholarships I could apply for - based on my interest in Machine Learning and Deep Learning.

I have always had an interest in AI and Machine Learning, so when this opportunity came knocking I did not even hesitate so for obvious reason I opted to apply for the scholarship AI programming with Python Udacity NanoDegree.
Completed my application and a few days later my application was successful, now it was off to the learning.
As part of the course, for someone to graduate/complete one has to complete an AI-based image classification project.
In this post, my focus will be directed to the final project that I needed to submit in order to receive the certificate. I had to build a state-of-the-art image classification application using PyTorch library.
More about Udacity and AAL (African App Launchpad Program) scholarship.
The scholarship program is aimed at residents of these countries: Egypt, Cameroon, Madagascar, Uganda, Namibia, Togo, Algeria, Ghana, Angola, Mauritania, Chad, South Africa, Niger, Malawi, The Democratic Republic of the Congo, Rwanda, The Gambia and Côte d’Ivoire.
It offers a diverse list of tracks one can apply for and receiver 100% grant for enrolment.
If you would like to register for the scholarship, and learn a new skill-set click here and on ‘How did you hear about us’ section click ‘ALL/NTL Graduate’ and enter my learner code such that I can get another grant.
Learner Code/ALL ID: 2-7193

The How
The course comprised of a few lessons and a project to complete to receive a Udacity Nanodegree certificate.
The list below details the lessons/parts that I had to complete:
Part 1: Introduction to AI Programming
This lesson was more of an introduction to the course and what is expected of the student including some of the examples someone that acquired these skills would be capable of doing or achieving.
Part 2: Intro to Python
This lessons for me was a walk in the park as already I was skilled in Python and the modules listed in part 3.
Part 3: Numpy, Pandas, Matplotlib
In this lesson I had to focus more on library packages for Python, such as : Numpy (which adds support for large data), Pandas (which is used for data manipulation and analysis) And Matplotlib (which is used for data visualization).
Part 4: Linear Algebra Essentials
I thought by having completed a degree in Electrical Engineering would add some advantage on part 4 but Noooooooo! I realised that most of us while at University only studied to PASS and not study to know - Sad truth, with that said I needed to do some revision especially in differentiation and integration with focus on the chain rule and statistics. It boggles me why we are not taught statistics in high school as we use it more than we use geometry but I suppose that is a discussion for another time.
Part 5: Neural Networks
Deep learning has several applications such as detecting spam in emails, forecasting stock prices even the weather, images or faces in pictures, medical diagnosis, self driving cars and many more.
Neural networks are considered to be the heart of deep learning. Neural networks vaguely mimics the process of how the brain operates, with neurons that fire the bits of information. A deep neural network (DNN) has lots of nodes, lots of edges, lots of layers, information coming and going through these layers.
The image above illustrates how a simple neural network does a good job classifying between cats and dogs. Let me explain some terminologies that lets us name all these different parts of the neural network above.
The leftmost layer in this network is called the input layer, and the neurons within the layer are called input neurons. The rightmost/output layer contains the output neurons as in this case, a single output neuron. The middle layer is called a hidden layer, since the neurons in this layer are neither inputs nor outputs. The term “hidden” simply means nothing more than “not an input or an output”. The network above has just 4 hidden layers, but some complex networks can have multiple hidden layers this is called a multiple layer network (multilayer perceptrons) *
An image of a cat/dog is given as input to the neural network(classifier) that classifies the given image and then results in accurate output saying whether it is dog/cat - simple enough.
Building a neural network from scratch would be fun, but there is no point in reinventing the wheel. Therefore, we’ll use a pre-built and pre-trained model applying transfer learning.
The logic of transfer learning is simple and straight-forward, take a model that was trained on a large dataset and transfer its knowledge to a smaller dataset. For object recognition with a Convolutional Neural Network, we freeze the early convolutional layers of the network and only train the last few layers which makes a prediction. The idea is the convolutional layers extract general, low-level features that are applicable across images - such as edges, patterns, gradients - and the later layers identify specific features within an image such as eyes or wheels.
This part of the course helped me understand what is under the hood and helped me acquire a solid foundation in deep learning and neural networks which I used to build the image classifier project. I will not cover the course contents but the paragraph above details how AI and Machine learning kinda works.
I found this explanation of Neural Network great by Dr Mike Pound.
This YouTube series by 3Blue1Brown explains Neural Networks.
A friendly introduction to Convolutional Neural Networks and Image Recognition
A great illustration for Convolutional Neural Networks using excel spreadsheet @ 4:15.
Part 6: Image Classifier Project
The last part of the course was more aimed at tools and how to use them. I learnt about techniques on how to improve the training of a neural network, and how to use PyTorch library for building deep learning models.
By the time I am writing this post there’s currently 2 (two) open source libraries that are taking over the world by storm in the AI and Machine Learning field namely: Facebook’s PyTorch and Google’s TensorFlow.
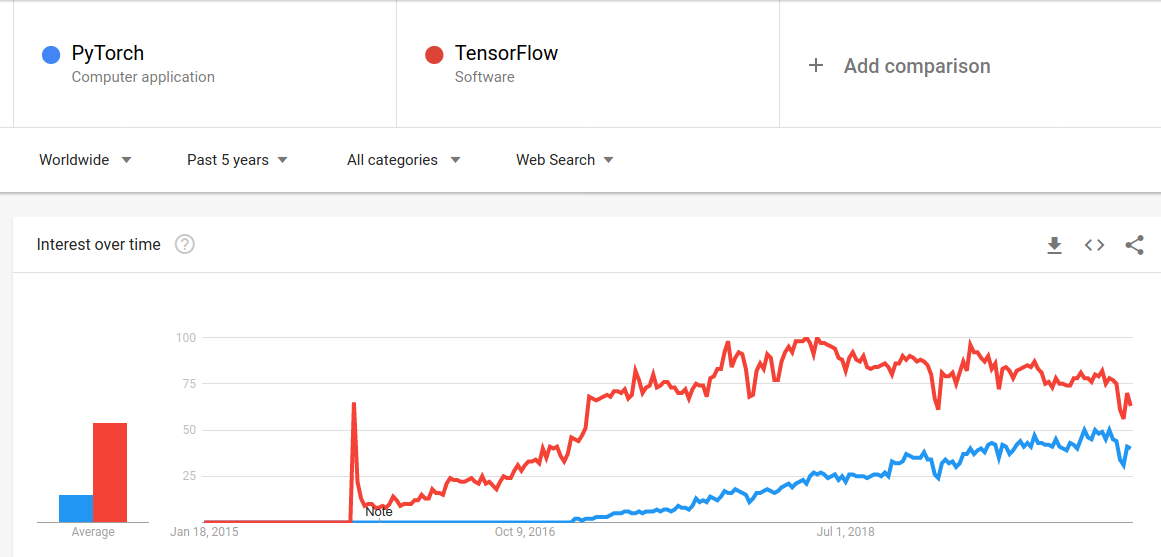 Image: Pytorch vs Tensorflow
The image above illustrates the constant growing adoption of PyTorch, this is mostly due to researchers and students as it is easier to use (It is more Pythonic), while in industry, Tensorflow is currently still the platform of choice.
Pytorch offers few advantages over Tensorflow:
- Simplicity: It is very pythonic and integrates easily with the rest of the Python ecosystem i.e. It is easy to learn, use, extend, and debug.
- Great API: PyTorch shines in term of usability due to better designed Object Oriented classes which encapsulate all of the important data choices along with the choice of model architecture. The documentation of PyTorch is also very brilliant and helpful for beginners.
- Dynamic Graphs: PyTorch implements dynamic computational graphs. Which means that the network can change behaviour as it is being run, with little or no overhead. This is extremely helpful for debugging and also for constructing sophisticated models with minimal effort and allowing PyTorch expressions to be automatically differentiated.
The Walk-through
The walk through continues in My Experience And What I Learned From Udacity AI Programming With Python Nano-Degree: Part 2.
This concludes the walk-through and the Jupyter notebook and Python scripts can be found on my forked GitHub repository
Resource
- Transfer Learning with Pytorch
- Pytorch Tutorials
- Training AlexNet with tips and checks on how to train CNNs: Practical CNNs in PyTorch
- Get Started with PyTorch – Learn How to Build Quick & Accurate Neural Networks
Reference
- African App Launchpad Program
- PyTorch
- What is Pythonic?
- What’s the difference between a matrix and a tensor?
- The architecture of neural networks
- Transfer Learning with Convolutional Neural Networks in PyTorch
- PyTorch for Deep Learning: A Quick Guide for Starters
- The State of Machine Learning Frameworks in 2019