The Story

With the mass protesting happen around the world, social media privacy has become very important. One thing a lot of people do not consider when taking photos of protesters is to protect the protesters themselves. Photos and videos of these protests have been used for facial recognition or identifying protesters, arresting or mistreating them *
In this post, I will walk you through a simple way of using scikit-image for image processing to detect faces using local binary patterns supported cascade classifiers [almost 20 yrs old tech] thereafter blur them using a Gaussian blur filters. However, I will not dive deep into how face detection works with cascade classifiers, I found a good read here
Note: False detections are inevitable using cascade classifiers and if you want to have a really precise detector, you will have to train it yourself using OpenCV train cascade utility or toggle the knobs here.
Alternatively, use Intel’s OpenVINO face-detection models or CNN’s pre-trained models.
Some good resources wrt to haar cascaded classifier and the Viola-Jones Algorithm
TL;DR
Go ahead and clone the repo: https://github.com/mmphego/privacy_protection
The How
After completing the course on Image Processing with Python from @datacamp, I decided to take the knowledge gained and apply it on a real-life problem that we are facing wrt to the high number of protests happening around us.
Click Here: Learn Data Science Online for FREE
The course offered a hands-on approach on the subject of image processing using the scikit-image library, from image restoration, denoising, segmentation and canny edges.
From my previous experience working with image processing libraries, I found that scikit-image is well documented and the API is easy-to-use. However, OpenCV outperforms it mainly since OpenCV API is essentially a C++ API that wraps around Python.
As part of my #100DaysOfCode challenge, I did a simple performance comparison between OpenCV and scikit-image, time-taken to load images and convert an RGB image to grayscale & corner detection.
- Did a simple performance analysis between #OpenCV and #Skimage, time taken to load and convert image grey and corner detection.)
— Mpho Mphego (@MphoMphego) August 11, 2020
- From the results observed #OpenCV FTW in terms of performance.#100DaysOfCode #EdgeAI #Python #ImageProcessingDatacamp pic.twitter.com/SUm2PJLAaY
The Walk-through
The application runs from a Docker image that I have baked Intel OpenVINO and dependencies in, alternatively install scikit-image and opencv2 library.
-
pip install scikit-image opencv-contrib-python opencv-pythonor, - Just run:
docker pull mmphego/intel-openvino
Not sure what Docker is, watch this
Usage
In order to use the application run the following command:
docker run --rm -ti \
--volume "$PWD":/app \
--env DISPLAY=$DISPLAY \
--volume=$HOME/.Xauthority:/root/.Xauthority \
--volume="/tmp/.X11-unix:/tmp/.X11-unix:rw" \
--device /dev/video0 \
mmphego/intel-openvino \
bash -c "\
    source /opt/intel/openvino/bin/setupvars.sh && \
    python main.py -i blm.jpg
    "
Understand Docker extra parameters here.
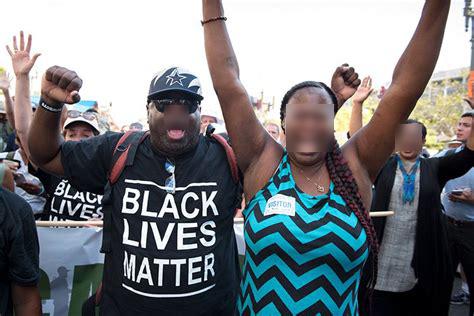
Original Image:

Blurred Faces (Well sort-off):
Code Walkthrough
The code contains enough comments for one to understand what is happening under the hood when in doubt leave a comment else Google.
import argparse

import cv2

from matplotlib import pyplot as plt
from skimage import data
from skimage.feature import Cascade
from skimage.filters import gaussian
from skimage.io import imread, imsave


def get_face_rectangle(orig_image, detected_face):
    """
    Extracts the face from the image using the coordinates of the detected image
    """
    # X and Y starting points of the face rectangle
    x, y = detected_face["r"], detected_face["c"]

    # The width and height of the face rectangle
    width, height = (
        detected_face["r"] + detected_face["width"],
        detected_face["c"] + detected_face["height"],
    )

    # Extract the detected face
    face = orig_image[x:width, y:height]
    return face


def merge_blurry_face(original, gaussian_image, detected_face):
    # X and Y starting points of the face rectangle
    x, y = detected_face["r"], detected_face["c"]
    # The width and height of the face rectangle
    width, height = (
        detected_face["r"] + detected_face["width"],
        detected_face["c"] + detected_face["height"],
    )

    original[x:width, y:height] = gaussian_image
    return original


def show_image(image, title="Image", cmap_type="gray"):
    plt.figure(figsize=(12, 10))
    # plt.imshow(image, cmap=cmap_type)
    plt.imshow(image)
    plt.title(title)
    plt.axis("on")
    plt.show()


def show_detected_face_obtain_faces(result, detected, title="Face image"):
    plt.figure()
    plt.imshow(result)
    img_desc = plt.gca()
    plt.set_cmap("gray")
    plt.title(title)
    plt.axis("off")

    for patch in detected:
        img_desc.add_patch(
            patches.Rectangle(
                (patch["c"], patch["r"]),
                patch["width"],
                patch["height"],
                fill=False,
                color="r",
                linewidth=2,
            )
        )

    plt.show()
    rostros = [
        result[d["r"] : d["r"] + d["width"], d["c"] : d["c"] + d["height"]]
        for d in detected
    ]
    return rostros


def face_detections(
    image, scale_factor=1.1, step_ratio=1.3, min_size=(10, 10), max_size=(400, 400)
):
    # Load the trained file from data
    trained_file = data.lbp_frontal_face_cascade_filename()

    # Initialize the detector cascade
    detector = Cascade(trained_file)

    # https://scikit-image.org/docs/stable/auto_examples/applications/plot_face_detection.html#sphx-glr-download-auto-examples-applications-plot-face-detection-py
    # Detect faces with min and max size of searching window
    detected_faces = detector.detect_multi_scale(
        img=image,
        scale_factor=scale_factor,
        step_ratio=step_ratio,
        min_size=min_size,
        max_size=max_size,
    )
    return detected_faces


def blur_faces(image, detected_faces):
    resulting_image = None
    # For each detected face
    for detected_face in detected_faces:
        # Obtain the face rectangle from detected coordinates
        face = get_face_rectangle(image, detected_face)

        # Apply Gaussian filter to extracted face
        # Scikit-image
        # blurred_face = gaussian(face, multichannel=True, sigma=(45,45))

        # OpenCV2
        blurred_face = cv2.GaussianBlur(face, (45, 45), cv2.BORDER_DEFAULT)

        # Merge this blurry face to our final image and show it
        resulting_image = merge_blurry_face(image, blurred_face, detected_face)

    return resulting_image


def arg_parser():
    """Parse command line arguments.

    :return: command-line arguments
    """
    parser = argparse.ArgumentParser()

    parser.add_argument(
        "-i", "--input", required=True, type=str, help="Path to an image.",
    )
    # TODO: Add Cascade.detect_multi_scale params
    return parser.parse_args()


if __name__ == "__main__":
    args = arg_parser()
    image = imread(args.input)
    detected_faces = face_detections(image)
    resulting_image = blur_faces(image, detected_faces)
    imsave("Blurred_Faces.jpg", resulting_image)
Reference
- *Police arrest artist who stopped posting protest photos to shield activists from law
- What’s the Difference Between Haar-Feature Classifiers and Convolutional Neural Networks?
- Deep Learning Haar Cascade Explained
- Haar-like feature
- image-scrubber: a tool for anonymizing photographs taken at protests.